How to fix a broken thread in your woven wrap:
If you have been following along with our series of "How to care for your woven wrap" you will see that we are working our way down the list of common issues with woven wraps and the care for them. I hope that these have helped you along your way, and in your ownership of a woven wrap. This blog post will show you how to fix that dreaded and all too common broken thread, that so many fear. Please do not fear a broken thread! One broken thread (even two or three) will not hurt you, your baby or the safety of the wrap. I will tell you later what would be a problem with broken threads in a woven wrap and what to look for.
Ok, let's get started. First, grab your woven wrap and let's figure out what type of broken thread you're dealing with. Do you have two threads visible? If so, follow the first set of directions. This is a full broken thread and should be tied back together with one another. These threads will go towards one another or will be side by side.
Or can you only see one thread? If so, you will want to follow the second set of directions. This is called a tie off. Now, if you are seeing two ends of the thread coming out of your woven wrap but they are going away from each other. Like this picture below:
This is called a weaver knot. Please see our blog "What to expect with your woven", it will go in depth what a weaver's knot is and what you can do about these. Again, these are common in woven wraps and are not considered a "flaw".
Now you'll need to go find yourself a sewing needle. You will only need the sewing needle for when you have one side of the thread and the other can not be found. You could use anything pointy and sharp. I'm known to use my earring at a babywearing meeting to help someone with a pull or broken thread. I have even used that to fix thread shifting.
Let's begin with getting these broken threads fixed.
First up is the broken thread with both ends showing.
Here is another image of the broken thread:
Ok, let's get started. First, grab your woven wrap and let's figure out what type of broken thread you're dealing with. Do you have two threads visible? If so, follow the first set of directions. This is a full broken thread and should be tied back together with one another. These threads will go towards one another or will be side by side.
Or can you only see one thread? If so, you will want to follow the second set of directions. This is called a tie off. Now, if you are seeing two ends of the thread coming out of your woven wrap but they are going away from each other. Like this picture below:
 |
| Weaver's Knot (the thread go away from each other) |
Now you'll need to go find yourself a sewing needle. You will only need the sewing needle for when you have one side of the thread and the other can not be found. You could use anything pointy and sharp. I'm known to use my earring at a babywearing meeting to help someone with a pull or broken thread. I have even used that to fix thread shifting.
Let's begin with getting these broken threads fixed.
First up is the broken thread with both ends showing.
 |
| Broken thread-both sides of thread viewable |

You will want to start by crossing those two thread to begin to tie a knot. You will in the end be doing a double knot as close to the base of the threads. The base is where the two threads meet the woven wrap.
 |
| Cross one to begin |
Next, you will put one of the threads (under or over, depends on which thread you are working with) under or over the other thread. Just as you were tying your shoe.
 |
| First loop |
Pull that first loop down to the base so your knot will lock at the bottom.
 |
| First loop close to base of wrap |
 |
| Again, loop just like you just did to create a double knot. |
Once you loop again, you will then pull that loop down to the base again to create your full double knot.
 |
| Your finished knot |
Your broken thread is now tied off and fixed. At this point you can snip/cut that extra thread or if your more comfortable you can weave them back in. PLEASE, PLEASE be safe to not cut your woven wrap in the process. (Marsupial Mamas, LLC is not responsible for any damage that you may cause to your woven wrap)
 |
| This is the knot after the extra was snipped off. |
Once you have clipped the extra thread off. You are left with just your knot. You can then tuck/push down this knot more into the weave so it blends in. However, a nice warm wash (depending on blend) will tighten up this area again and most likely tuck this knot into the weave for you never to see again.
 |
| The knot is at the base of my finger and very hard to see. |
Throw it into the wash to tighten up all of these fibers around the area you just worked with. Please follow all washing guideline from the manufacturer. Washing directions will be based off of blend.
Broken Thread with one thread in view:
To start with one thread in view. Find your thread and grab a needle.
 |
| One broken thread |
You will take this tread and thread it through a sewing needle. You are doing this so you can pull it through to the opposite side of the wrap. I added a small piece of tape around the end of my thread. It was a fuzzy thread and this will help me get it through the sewing needle hole.
 |
| Threading the needle to pull to opposite side of wrap. |
Pull it through the opposite side of the woven wrap.
 |
| Flip wrap over and pull through |
Flip your woven wrap to the other side to pull the needle through. At this point you will begin to work on this side of the wrap from here on out. Take the needle out. Now, use the needle to get your first knot loop.
 |
| Knot loop. Use your needle to help. |
 |
| View of the knot at the base. |
You will see that the knot is now at the base once I have gently pulled the thread back into the position.
 |
| Knot at base of wrap |
You then have two options: You can clip the extra thread (PLEASE, PLEASE be safe to not cut your woven wrap in the process. (Marsupial Mamas, LLC is not responsible for any damage that you may cause to your woven wrap) or you can weave the rest of the extra into the wrap so it is not hanging out or seen. Here, I have chosen to clip the extra.
 |
| Finished knot at base of needle. |
Give it a good wash to again tighten up those fibers around that area. This will also allow your tied off thread to get comfortable in its new area. Please follow all washing guideline from the manufacturer. Washing directions will be based off of blend.
Please also to remember to always disclose any of these that we have talked about here today to your buyer if you choose to sell your woven wrap.
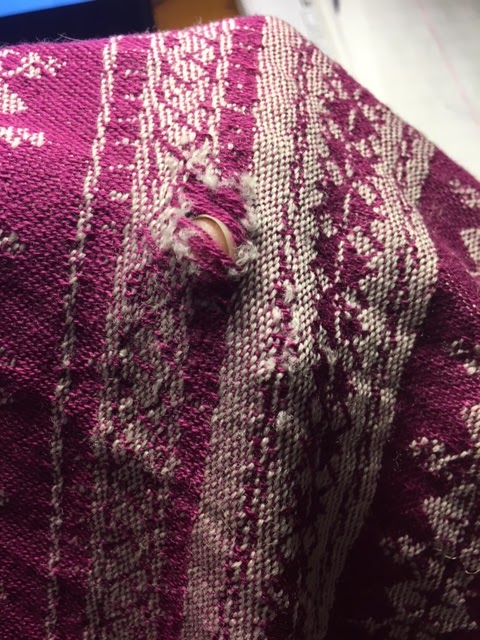
When do broken threads become an issue you ask? Well, your broken threads become a safety issue, when you have a whole area of broken threads that it becomes a hole.
 |
| An area of many broken threads. |
You will see that there are many broken threads in this photo. As you look at it this way, this does not look that bad. However, when you add weight and pressure to this, it will then add stress to an area that is normally double it's threads.
 |
| My finger is viewable thru the hole. |
If you have any questions at all about anything that you read or saw here today. Please just send an email to Jilliane@marsupial-mamas.com and I will gladly help you fix your woven wrap. If you have any tips or tricks to make this task easier, I would love to hear them. Please email me as well. I hope you have enjoyed this lesson and it helps you on your babywearing journey.
Comments
Post a Comment